Showing posts with label garlic. Show all posts

Tuesday, August 24, 2010

Yummus Hummus

So.
I've missed you. How are you? I've been thinking about you and wondering what's going on in your world.
Things here are a little hectic with the start of school, but so far we're getting along nicely.

Went to a friend's house Saturday (yes, they give me shore leave every now and then) and I felt like I needed to bring something. This I decide about 20 minutes before I need to be there. And my pantry is empty. What the heck can I bring, AND for extra points what can I bring... that I can eat?
(This tastes 1000 times better than it looks)

Love her or hate her, Sandra Lee is secretly brilliant in situations like these. Fast, easy and totally delicious. So much so that I think.....

There's a Hummus Among Us

1 large clove of garlic (we have the kind already minced... I use about a tablespoon)
1 can (15.5 oz) of garbanzo (chick peas) beans
3 tbs. sour cream (KEY INGREDIENT!)
3 tbs. lemon juice (I use the bottled kind)
1/2 t. salt
1/4 t. ground cumin (another KEY ingredient)
1/4 c. extra virgin olive oil

Mince garlic (if you use fresh) in the food processor, otherwise scoop a heapin' helpin' out of the jar. Dump this and everything else into the food processor, except the olive oil. Process until ALMOST smooth. With machine still running add the olive oil and process until mixture is smooth.

Serve with corn chips, or for you of whom I am very jealous, warm pita chips. Yes, I know I could make or buy GF stuff like this, but I have to be at a party in 20 minutes... and if I choose to bake GF, pita chips won't be on the top of the list.

Pin It
Bookmark and Share

Thursday, December 11, 2008

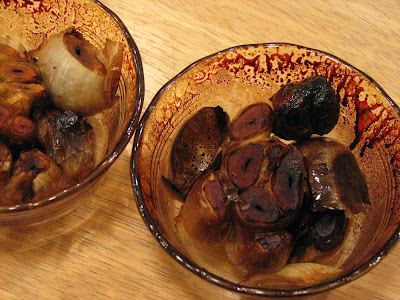
How NOT to Roast Garlic...

This is what NOT to do:
1) prepare 2 perfectly innocent heads of garlic by peeling the skins off, leaving the root intact, then cutting off the tops of the cloves and rubbing the entire thing with olive oil, especially into the cut areas.
2) put said garlic heads into 2 cute little mini-Pyrex ramekins that you love and are the only 2 you have left from a set of 6.
3) put the above assembly into the microwave for 5 minutes.
4) get distracted doing something else in another room
5) come back into the kitchen trying to find the source of that horrible burning smell.
6) open the door to the microwave and have massive clouds of thick, choking gray smoke billow out.
7) set off the fire alarms and fill the whole house top to bottom with smoke and that sickening burnt stuff smell that will take about a week (or more) to fully disappear. Open all the doors and windows in the interim, letting all the heat (and smoke) out.
8) try to clean the inside of the microwave out using spray cleaner and Barkeepers Friend.
9) set your favorite 4 cup Pyrex measuring cup in the microwave with 1 cup of water and a splash of lemon juice and bring to a boil so that the water vapor helps steam off the goop and clean out the smell that is now permeating the guts of the microwave.
10) open the door to the microwave and remove the favorite measuring cup and have the bloody thing start reboiling, overflowing onto your hand.

Things TO do:
11) scream obscenities at the top of your lungs that would make a sailor blush and fling the cup and liquid across the room in the general direction of your porcelain sink and have it shatter in there into a million pieces. Try to get it all in the sink and not have it splash all over the floor and cabinets. Avoiding hurling it through the window is also a good idea.
12) run your now scalded hand under cool water for several minutes until you realize that your state is in a drought and that they changed the billing /water tier consumption rate charges on your house and that it will cost a small fortune to keep running the water. Yell for your 9 year old to bring you a bowl (NOW!) and plunge your hand into the bowl of cool (not cold) water. Add a few ice cubes when the water becomes bearable.
13) sit there for, oh, about 1 1/2 hours, swishing your hand gently back and forth. While you're doing this, it's a good time to make your kindergartener sit and write out 10 times "I follow class rules". This will take the whole 1 1/2 hours, so it is a constructive use of your otherwise free time.
14) call every urgent care center within a 20 mile radius and discover that they all close at 8:00 pm and that unless you want to go camp out in the ER until morning with all the really sick people, you're SOL.
15) call Walgreens to see if they have anything and learn that the answer is no, not really.
16) send your husband to dig around in the medicine closet and find the jar of Silvadene burn cream that expired back in 2005, but that you kept "just in case".
17) realize that this is one of those moments and apply the cream. Have pain ebb and flow between excruciating and tolerable for about an hour.
18) breathe a deep sigh of relief and gratitude that the old cream still works and that the pain is abating.
19) do not take a picture of your hand to document the experience.
20) be extremely grateful that the cream and cold water worked and that the burn is not near as bad as it could have been.
21) tell the internet and the Barefoot Bloggers that you were going to make the coq au vin but got sidetracked by all this and you'll do it in the next few days. Beg forgiveness and plead insanity. Type the post with the one good hand and two fingers from the other because you are not 100%, but can't be separated from your computer and the internet for any length of time without going loco.
22) the next time you boil water in the microwave for a longish period of time, put a bamboo skewer in the water to give the bubbles an escape route and not explode on you.
23) buy a jar of roasted garlic at Trader Joe's or Harry's/Whole Foods. You'll have it on hand (ow!) when you need it in a pinch and don't have time to roast it properly.

Pin It
Bookmark and Share

Wednesday, October 29, 2008

Daring Baker's October Challenge: Pizza Dough!

This month's Challenge was “Pizza Napoletana” from Peter Reinhart's “The Bread Baker's Apprentice”. You had to film or photograph your tossing attempt and you needed to use both a “sauce” (or something otherwise spreadable) and “toppings”.

I would NEVER have made this without the DBers, much less video taped myself doing it! Please excuse my disaster of a kitchen and remember that the camera makes you look at least 10 20 pounds heavier than you actually are.


What a riot!

My variations were

Pizza 1: Apple with Caramelized Onion, Walnuts and Cheddar on a dough primed with Basil Flavored Olive Oil. (In hindsight, I should have sauteed/swished the onions in balsamic vinegar before putting them on the pizza. One bite without and I knew something was missing. I spritzed it on afterwards and it made it so much better.).

Pizza 2: Blue Cheese with Toasted Pine Nuts and Caramelized Onions on a spread of Mashed Roasted Garlic. Oh my. Sooooo good!

Cook’s Notes:
-I made the “regular” dough, aka: not the gluten-free one
-I used my stand mixer to combine the ingredients and knead the dough.
-I froze 4 of the 6 balls of dough for a later date
-I used an offset spatula to get the pizza off the cookie sheet and onto the pizza stone and then again to shimmy it off the stone and onto the cutting board
-I will use flour next time as the ballbearing / dough movement vehicle – no question. I forgot how I don’t really care for the gritty feeling of the cornmeal.

These pizzas were so wonderfully good - I can't wait to make good use of the stash of dough in my freezer and maybe get the kids into the act!

Thanks to Rosa from Rosa's Yummy Yums for selecting this month’s Daring Baker Challenge. You can find the complete recipe for the pizza dough on her site.

To see what all the other DBer’s did, you can find the blogroll here and if you’d like to join the monthly party, info about that can be found on that page as well.


Pin It
Bookmark and Share

Wednesday, October 15, 2008

Mmmmmm. Garlic.

I love garlic. I don’t think I could ever be a vampire or hang out with one, unless someone like Edward actually came along and if he had an aversion to garlic, then maybe, just maybe, I’d consider it.

We went to Harry’s/Whole Foods to get some items and I was absolutely transfixed with the garlic there – a mountain of pearly lumps covered with lovely white papery skin, just lying there, glowing with that oh so subtle luster, showing no hint of the exquisite deliciousness inside waiting to be coaxed out. (That sounds almost wicked, doesn’t it? Indeed. :>)

Here’s how to roast and toast your way to your own small mound of lusciousness.

Roasted Garlic

        1. Peel off the outermost layers of the garlic head skin, but leave the paper on the individual cloves. You just want to peel off all the excess, but leave the head itself intact.
        2. Carefully cut the tops off each of the individual cloves of garlic, just enough to let the olive oil soak in (coming next step) and to be able to squeeze the roasty toasty clove out after cooking. You might want to use a pot holder to hold the garlic while cutting to reduce the need for a trip to the ER if the knife slips. Some of these little guys can be slightly challenging to behead.
        3. After the tops have been trimmed, place the garlic heads in a cupcake/muffin pan. This keeps them upright and the oil in one place.
        4. Pour about 1 teaspoon of olive oil into the palm of your hand and rub the garlic head around in it until it’s well coated, working the oil down into the little creases and crevices.
        5. After the initial oil application put the head back into the muffin tin and pour another teaspoon of oil on top, letting it soak into the cut off tops and down into the clove.
        6. Cover each one individually with aluminum foil. Bake for 30 minutes. The cloves should be browned and soft when done.
        7. Cool to touch and then gently squeeze the clove until the meat pops up out of the outside shell. You may need to use a small knife or scissor to free any reluctant cloves.
        8. Spread these golden jewels on crusty bread, mash slightly and serve over pasta, or {evil grin} eat them plain, warm from the oven. Mmwwaahahaha!


      Pin It
      Bookmark and Share